What is this document for?
This document is a guide for how to deploy content to the Department for Education’s internal RStudio Connect servers, including R Shiny apps, RMarkdown/Quarto documents, pkgdown sites.
This guide is aimed at R Developers within the DfE who want to share their apps or documents within the department - RSConnect is behind the DfE firewall and so cannot be used for public-facing content.
Pre-requisites
There are some steps you must take before you can start the deployment process. All of these only need to be completed once, so if you deploy more content in future, you will not have to repeat these steps.
Install R & Rstudio: It is assumed if you are reading this that you have already developed using R and RStudio. If not, you must install these via the Software Centre and it is recommended that you get familiar with R and create your first app/document, then return to this guide when you are ready to deploy.
Install Git: You must have Git installed on your device, as you will need to use Git for version controlling your project. If you do not have Git installed, you can do so from here (if you are using Windows).
Ensure you have access to a DfE Azure Devops project: If your team do not already have a project you can request access to, you must raise a service desk request to create one.
Ensure you have RSConnect Licenses: In order to access anything on the RSConnect servers, a user must have a license - of which there are a limited amount. To ensure you have a license, you must raise a service desk request here (‘Assign RStudio Connect License’ -> ‘Both - add to VMT1PR-RSC User and VMT1PR-PP-RSC User’ -> Enter your email address -> Business Justification: e.g. ‘to develop and deploy R content to the RSConnect servers’). If you are unsure whether you already have a license or not, you can check using this app. If for example you already have access to the Prod server, you can modify the service desk request to only ask for a Pre-prod license.
Key concepts
R & RStudio
It is assumed if you are reading this that you know that R is a programming language and that RStudio is an Integrated Development Environment (IDE) that can be used to develop R projects. RStudio (the IDE) is produced by a company called Posit (previously they were also named RStudio) and this company offers several other enterprise software. One of Posit’s enterprise offerings is a web server for deploying and hosting R-based content - this is called RStudio Connect and is what we use at the DfE to share R content.
Git & Azure Devops
Git is a version control software that tracks changes to a project and allows you to better work collaboratively with others. Each project you work on should be contained within a Git repository (or ‘repo’ for short). Git repositories can also be linked to an online (or ‘remote’) repository, so that you (and anyone else) can save their changes to this remote repository. There are several free services for storing remote Git repositories: Github, Gitlab, Gitbucket being the most popular. As we are often working with sensitive data in the DfE and we have an existing business relationship with Microsoft, internally we use Azure Devops to host our remote Git repositories. Azure Devops has many functions, of which hosting Git repositories is just one, but for the purpose of deploying R content it is (along with release pipelines) the most important function. Repositories stored in Azure Devops are behind the DfE firewall.
Release Pipelines
Within Azure Devops, there is a framework called ‘Release pipelines’ - not to be confused with ‘Pipelines’, which are a separate thing. What these Release Pipelines can do, is take the contents of a Git repository, bundle it up and send it to a server along with some code to be run with it. In the case of deploying R content, we bundle a Git repository with some code that says ‘Deploy this to our RStudio Connect server’ and then send it to our ‘Build Server’ (which is separate to the RSConnect servers) which runs the accompanying code and deploys the content.
RSConnect
As mentioned above, RStudio Connect (RSConnect for short) is an enterprise offering from Posit which consists of a web server designed to host and share R content. It has many different features for simplifying management of a web server and a pretty front-end for users wanting to view any deployed R content.
DfE Infrastructure
At the DfE, we have paid to have two RSConnect servers - one for Production (Prod) and one for Pre-Production (Pre-Prod). We also have 1250 licenses that can be assigned to colleagues in the Department. Note that licenses are required to view any restricted content and so the majority of people who want to view any deployed content will need a license.
Content types
RSConnect supports many different types of R-based content. It is important to note that the way in which we deploy content at the DfE is non-standard. If you read the RStudio Connect user guide, any references to deploying content straight from RStudio IDE or different methods for publishing can be ignored as they do not apply to our scenario.
The deployment process we use at the DfE will fail if it cannot detect the type of content being deployed. Below is a table explaining what types of content can be deployed and the file(s) that must be present in order for that to be detected.
| Content type | Requirement |
|---|---|
| Shiny app | Either a file named ‘app.R’, OR two files named ‘ui.R’ and ‘server.R’ |
| RMarkdown | A file named ‘index.Rmd’ |
| bookdown | A file named ‘bookdown.yml’ |
| pkgdown | A folder named ‘docs’ |
| Static HTML page | A file named ‘index.html’ in a folder named ‘docs’ |
| plumber API | A file named ’plumber.R |
| Quarto | Not yet available |
Accessibility
The internal RSConnect servers are behind the DfE firewall and can be accessed by anyone from a DfE device. If you do not have a license then you will only be able to view content which has been open to be viewed by everyone in the department.
All RSConnect apps on the Production server can be accessed with any web browser (although Chrome or Firefox are recommended), and can all be accessed via a URL that starts with https://rsconnect/rsc/… - the end of the URL will be different for each piece of deployed content.
Preparing for deployment
Before you start the deployment process for a particular project, there are some steps you must take first to ensure that your project meets the requirements for deployed content within the Department.
Git & renv
Your project must be version controlled with Git: this can be done in several ways, such as with the
git initcommand in Git Bash or the command prompt, or in RStudio itself. If you are unfamiliar with Git, there are several tutorials online that can help - it is crucial that, at the very least, you are comfortable committing and pushing changes to a remote repository. You should ensure that you have a repository set up and you have committed your work so far.Your project must use
renv:renvis an R package that allows you to manage the packages used in your project. It keeps track of which packages you have installed and what versions you are using. This is useful when collaborating with others as it allows you to quickly and easily make sure you are using the same versions of the same packages as your collaborators - reducing the risk of differences across devices. Package management with renv is crucial for deploying content to RStudio Connect, however, because it is used by RSConnect to install all the packages needed for your content to work.- You can easily set up renv for an existing project using
renv::init()and making sure you runrenv::snapshot()(and commit any changes to Git) before every deployment.
- You can easily set up renv for an existing project using
Azure Devops
- Your project must have a remote repository on Azure Devops: as mentioned previously, you should have access to a an Azure Devops project. If you do - and you have set up Git correctly - you should be able to add this repository as a remote for your project and push any changes you have committed so far.
Pipelines & Deployment
Once you have your repository hosted on Azure Devops, you are ready to set up your Release Pipeline. This is what will actually perform the process of deploying your app to RSConnect.
Common types of pipeline
To help with the process of setting up a pipeline, there are two templates provided below which you can download and use to set up your pipeline, following the instructions below. But first you need to understand a bit more about release pipelines and the difference between the two templates below.
Release pipelines consist of an artifact and one or more stages.
The artifact is the source for any code that is to be deployed - this is your Azure Devops repository that you’ve set up to host your project repository.
Each stage, runs some code and optionally has some environment variables assigned to them which determine exactly how that code is run. In our case, we will use environment variables to determine whether we are deploying to the Production server or the Pre-Production server.
Each stage can also optionally have pre-deployment conditions, which must be met before a stage is begun. In our case, we can use this to set an ‘approver’ for deployment to a stage - e.g. if multiple people are working on a project, a lead developer may have to give approval for any deployment to Production.
When pipelines are set up, releases can then be created. Each release will travel from the artifact, along the pipeline and through each stage (as long as it passes the pre-deployment checks). An important point is that pipelines can be set up to automatically create releases whenever a change is pushed to the artifact (the Azure Devops repository). Combining this with the pre-deployment checks for each stage gives a multitude of options for how pipelines can work.
In practice, the vast majority of projects will suit either a 2-stage or 3-stage pipeline.
- In a 2-stage pipeline:
- If a change is made to any non-main branch in the repository:
- No release is created
- If a change is made to the main branch in the repository:
- A new release is created
- A ‘PreProd’ version of the content is deployed to the Pre-Production RSConnect server.
- If that is successful, pre-deployment conditions for Prod are checked (i.e. an approver may have to give consent for the release to continue)
- A ‘Prod’ version of the content is deployed to the Production RSConnect server (this will be what customers/viewers of your content see)
- If a change is made to any non-main branch in the repository:

A 2-stage pipeline is best for content that will iterate quickly, might only have one or two people working on it and typically may not require much QA/checking of changes. The general workflow will be that every time a change is made to the main branch and the content has been deployed to PreProd, the developer will check that it looks as expected and there aren’t any differences to how it appeared locally. If they are happy that the change has worked as expected, they can approve the change and it will be deployed to Prod.
- In a 3-stage pipeline:
- If a change is made to any non-main branch in the repository:
- A new release is created
- A ‘Dev’ version of the content is deployed to the Pre-Production RSConnect server.
- If a change is made to the main branch in the repository:
- A new release is created
- A ‘PreProd’ version of the content is deployed to the Pre-Production RSConnect server.
- If that is successful, pre-deployment conditions for Prod are checked (i.e. an approver may have to give consent for the release to continue)
- A ‘Prod’ version of the content is deployed to the Production RSConnect server (this will be what customers/viewers of your content see)
- If a change is made to any non-main branch in the repository:
A 3-stage pipeline provides more flexibility and more rigorous QA opportunities than a 2-stage pipeline. The general workflow will be that every time a change is made to a non-main branch of the repository, a Dev version of the content will be deployed to the Pre-Production RSConnect server. This can be then be viewed by the developer who made the change to see if it looks as expected. The Dev version will typically be where you test out potential changes where you are unsure if they will work as expected. Once you are happy that the Dev version is working, the changes can be merged into the main branch, which will trigger a deployment to PreProd. Here, the changes can be double checked, either by the developer or ideally another person. This is the final stage for ensuring the deployment won’t break anything and once this has been approved, it will deploy to the Prod version on the Production server and customers/viewers will be able to see the change.
If you are unsure which of the two pipelines is most appropriate for you, I’d recommend you default to the 3-stage pipeline as it allows more room for error and doesn’t increase the complexity of the pipeline too significantly.
Use the buttons below to download the relevant template:
Implementing your template
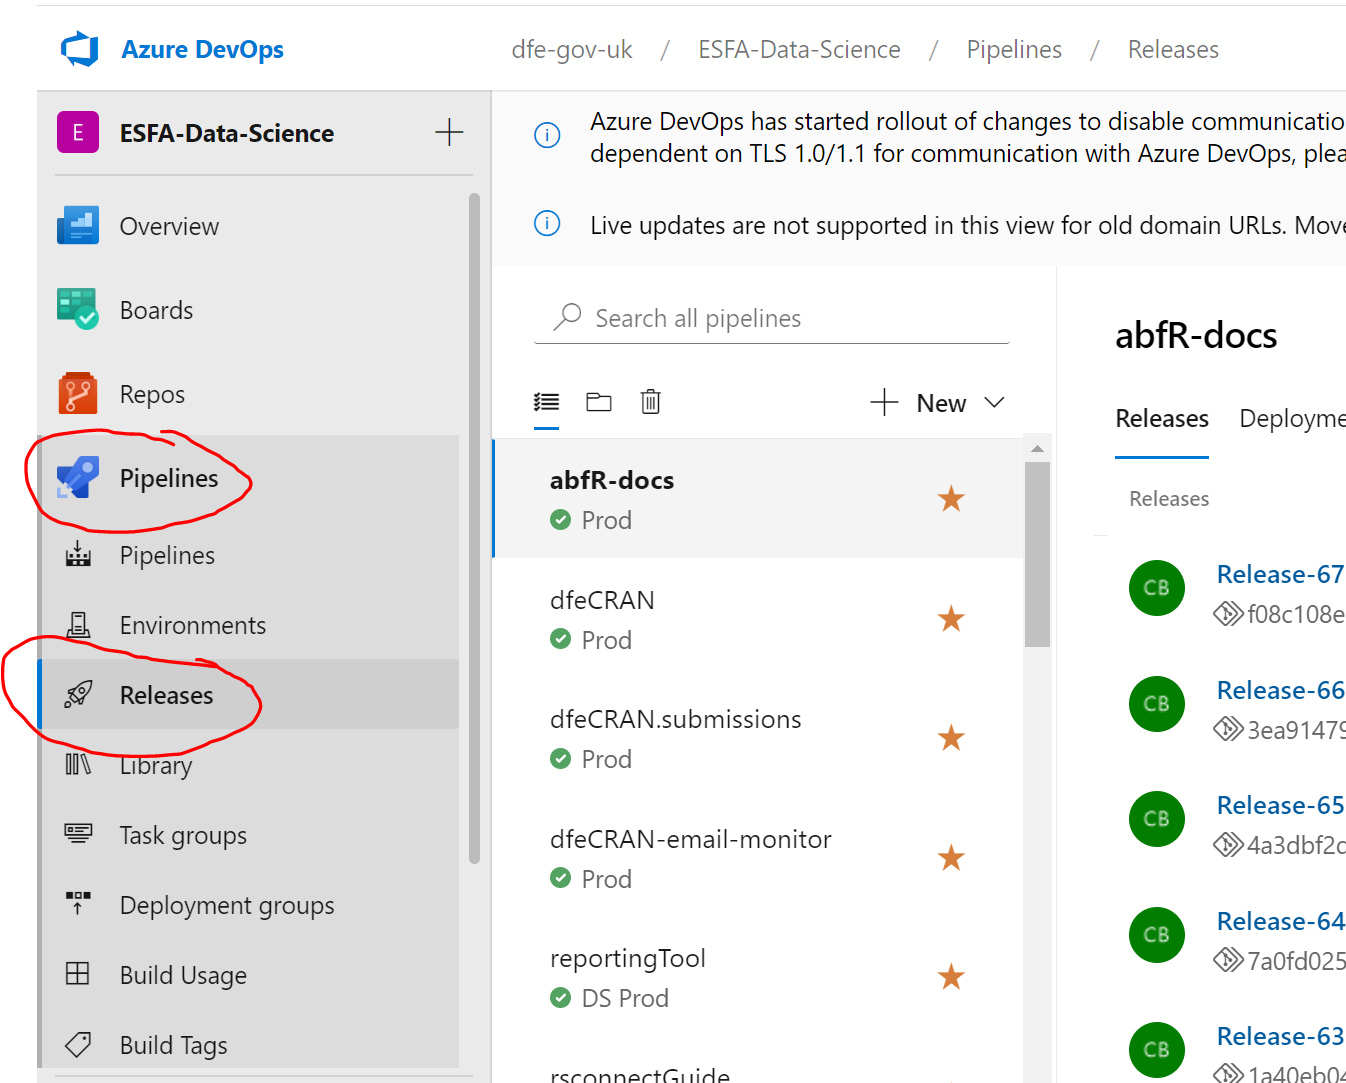
Once you have the json file template downloaded from above, you can create a new Release pipeline for your content. In an Azure Devops Project, go to Pipelines -> Releases (on the navigation menu on the left).
Click on ‘New’ and ‘Import Release Pipeline’
 This should bring up a dialog box where you can select the json template you downloaded above. Click OK and this should take you to your pipeline editing page.
There are a few more steps you must take before you can create your first release and these will differ depending on which of the two templates you are using.
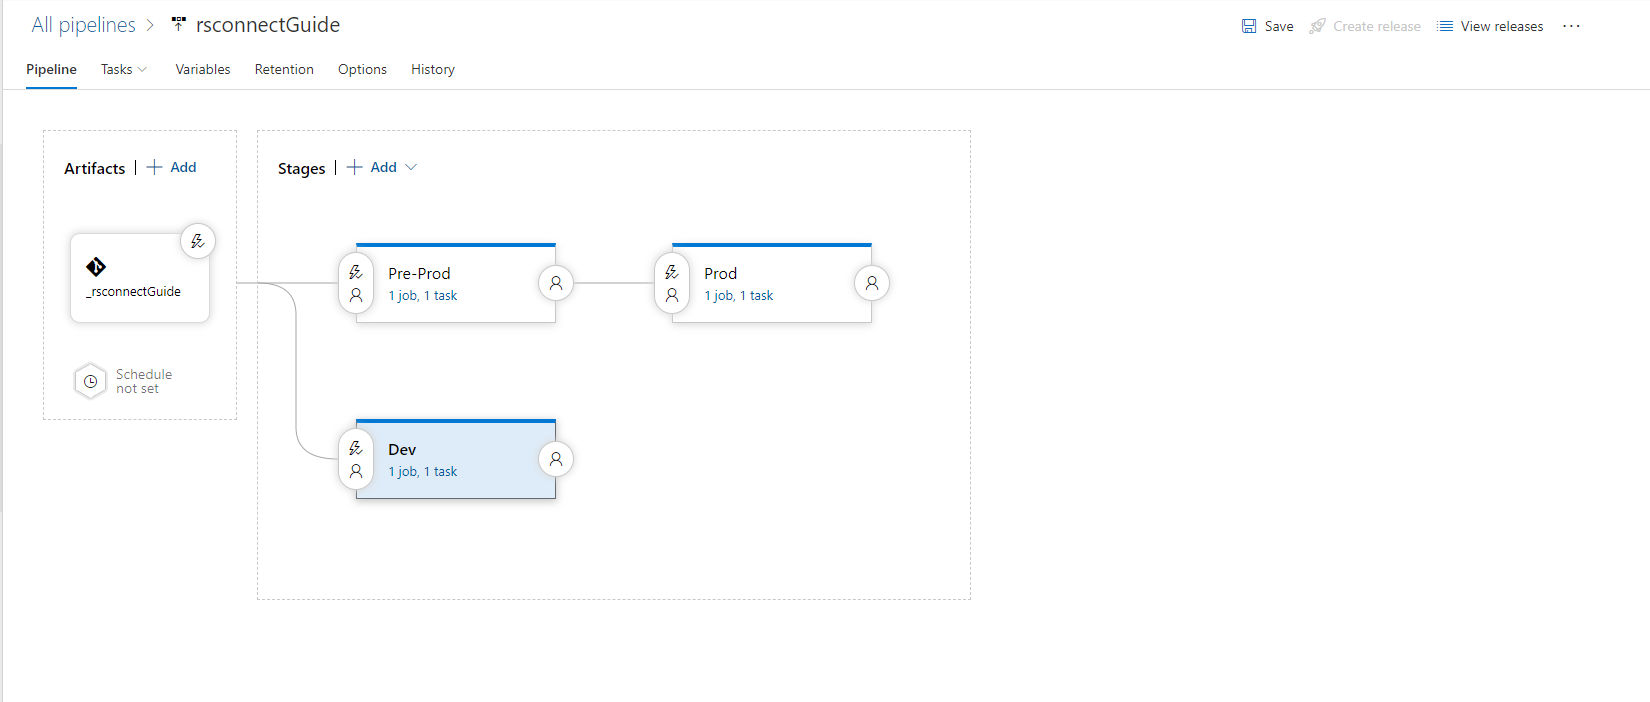
Two-stage pipeline
If you are using a 2-stage pipeline, your pipeline page should look like the image below:
First, you should rename your pipeline. Use the name of your repository or content and use hyphens instead of spaces.
Next you need to add the artifact, if you click on the box on the left that says ‘Add artifact’, it will bring up the menu below.
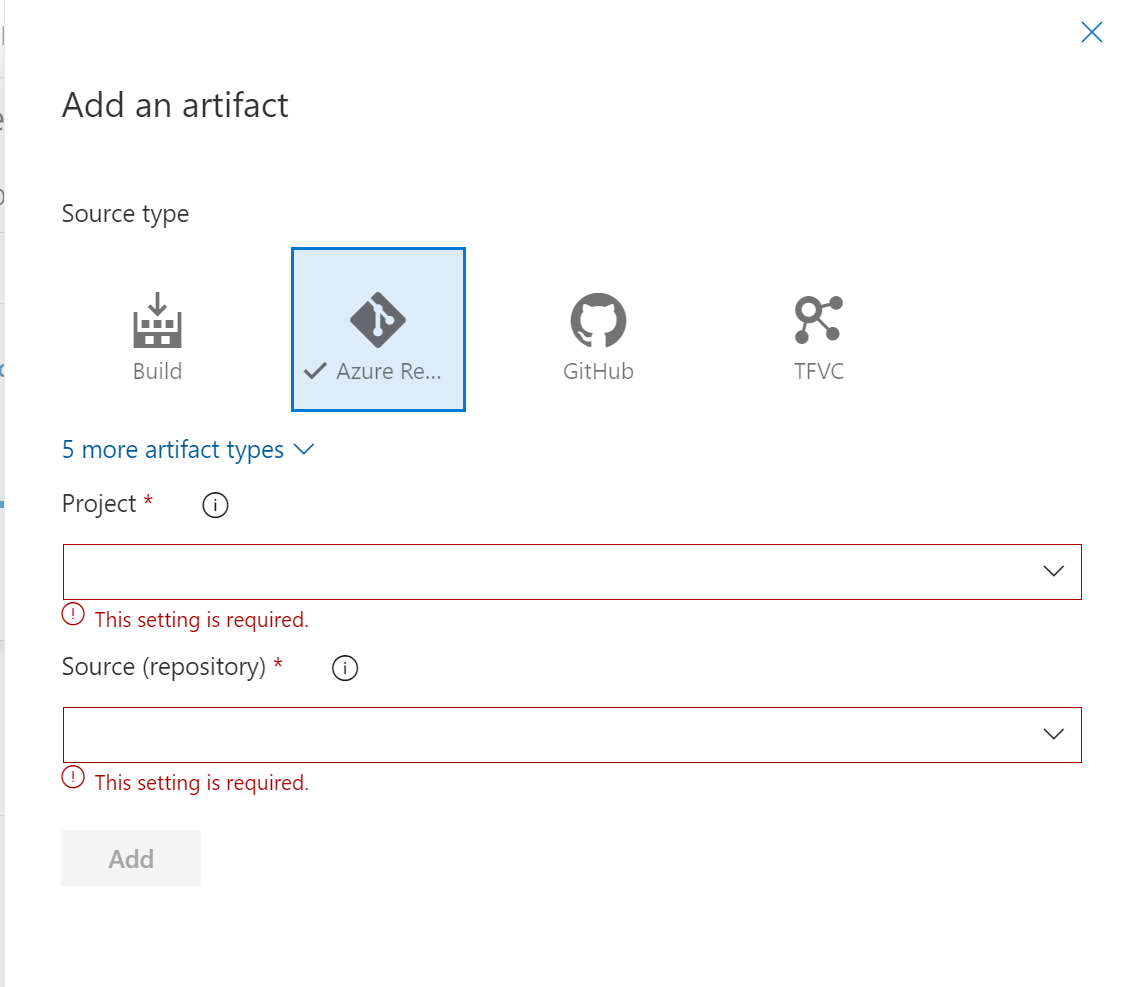
Here you should select your Azure Devops Project and your repository, after which some additional options will appear below. You should only need to add information for two of them.
For ‘Default branch’, select your main branch (i.e. ‘master’ or ‘main’)
For ‘Default version’, select ‘Latest from the default branch’
Then you can click ‘Add’ to add your artifact.
- Click on the ‘Pre-prod’ box, which will take you to the Task page for that stage. If you click on the ‘Deploy to RSConnect’ task, you should see something similiar to below.
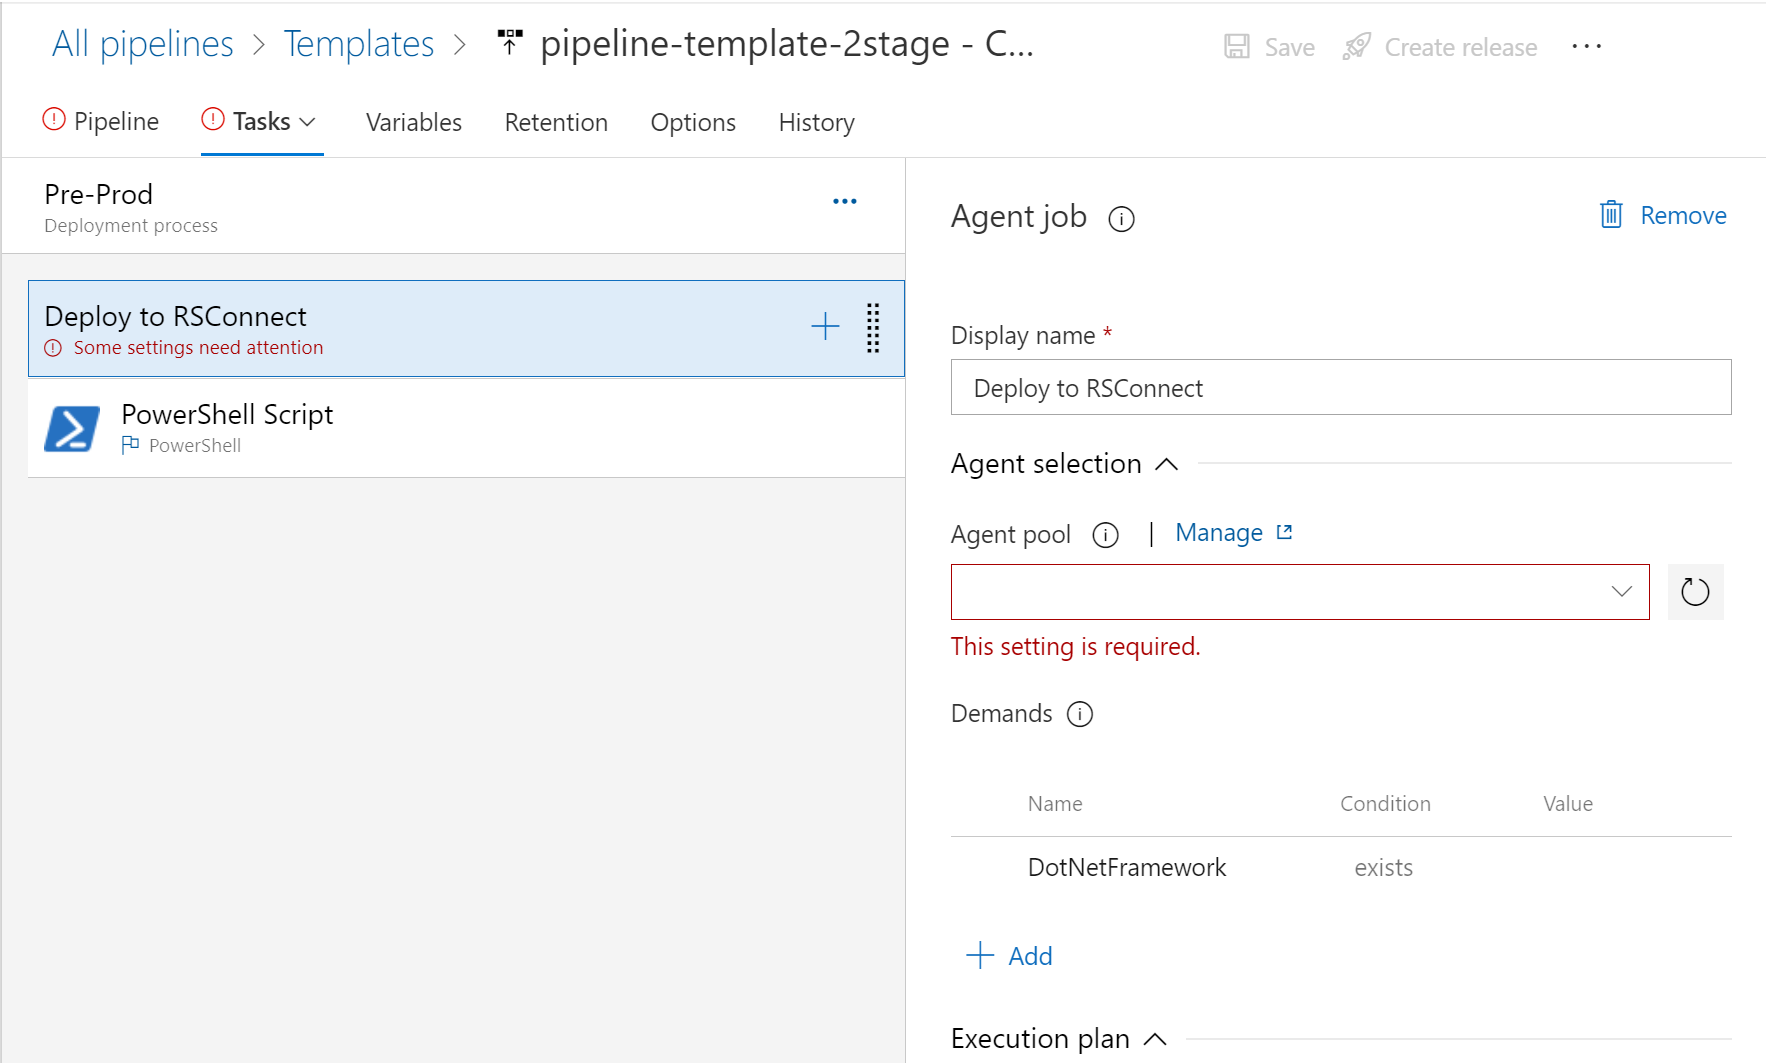
In the setting that requires attention - ‘Agent pool’ - select ‘RSConnect’. If you cannot see it, you will have to raise a service desk request to allow your Azure Devops project access to the build server.
You can then go back to the pipeline view by clicking ‘Pipeline’ in the menu above.
- Click the oval button on the left of the Prod stage. This will bring up the pre-deployment conditions for deployment to production.
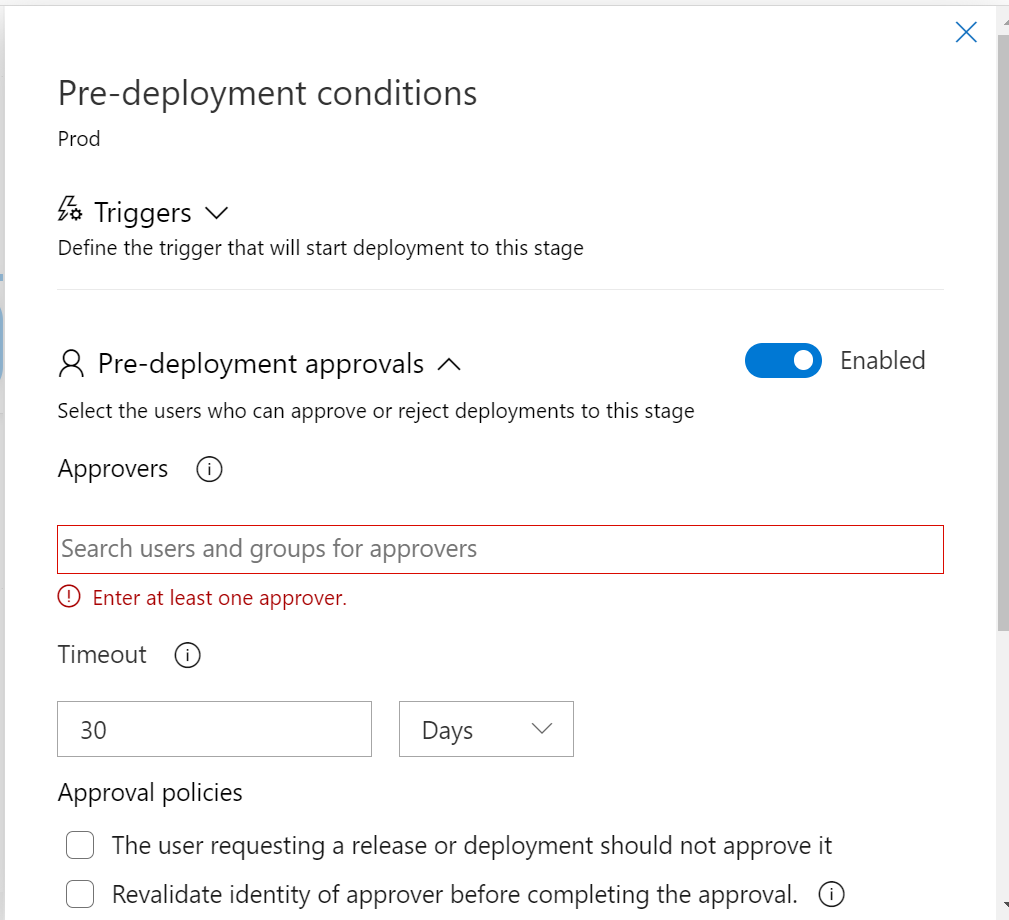
Here you can either select someone to be the approver, or disable this if you do not want it.
Repeat step 3, but for Prod this time.
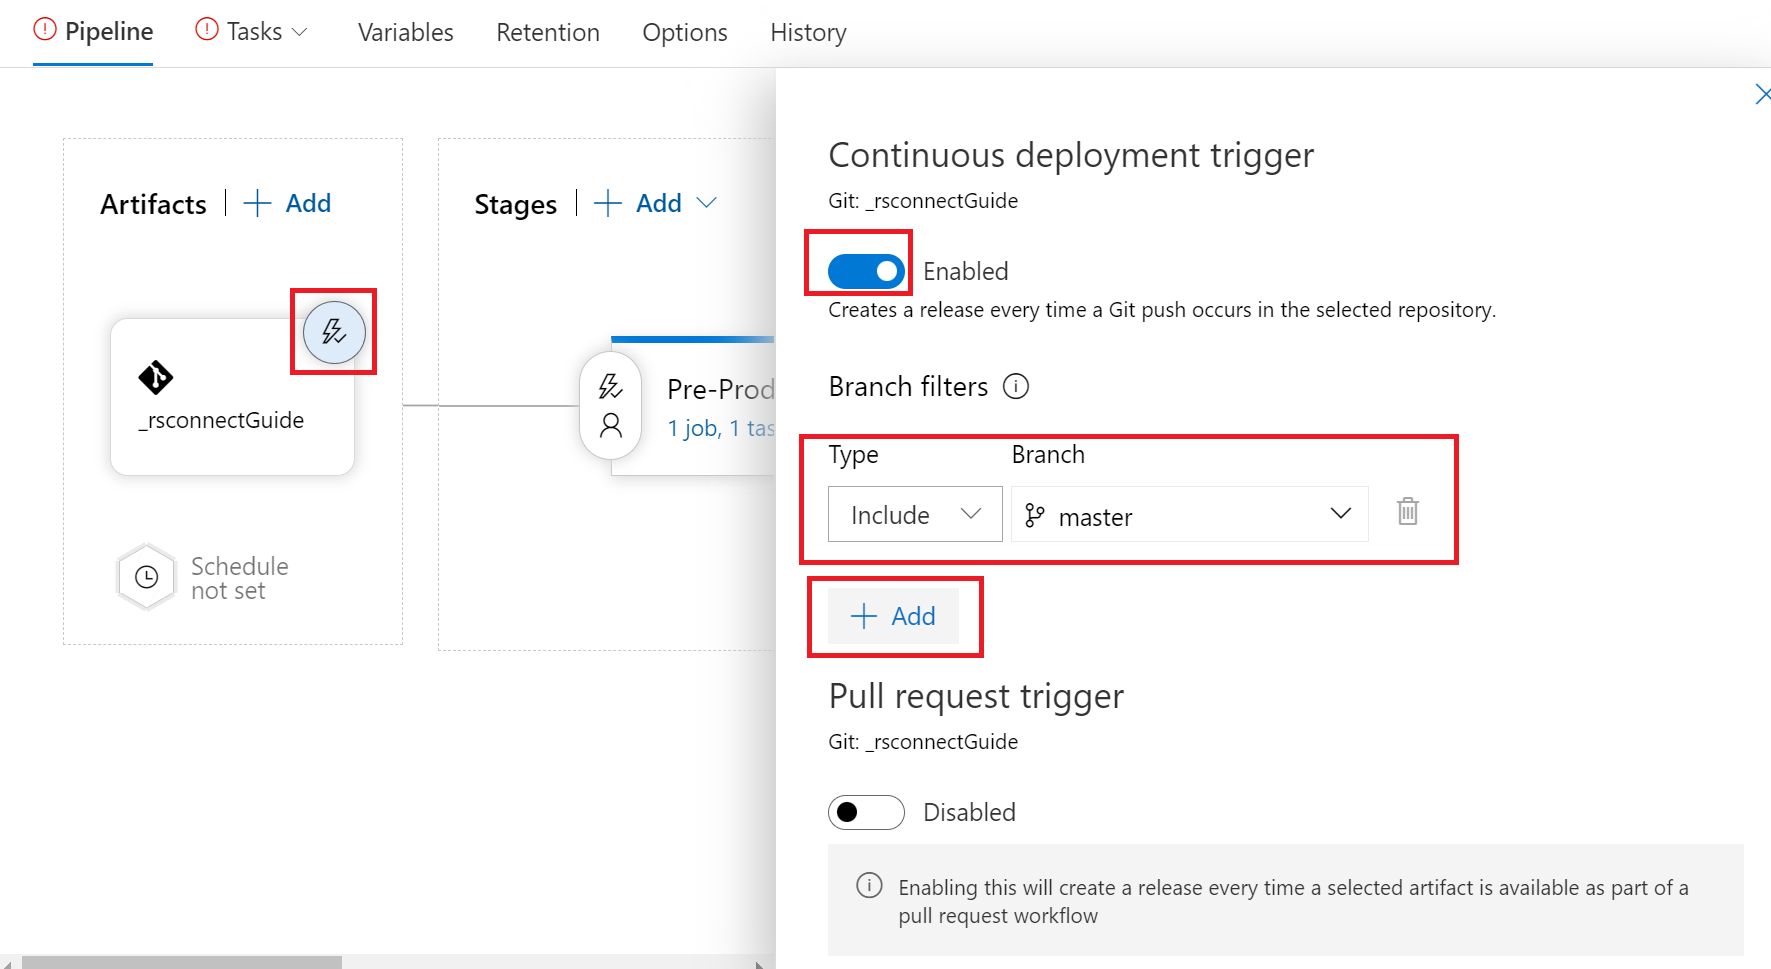
Next you should set up your artifact to create a release every time you make a change to the main branch. You can do this by clicking on the lightning bolt symbol on the right of your artifact. This will bring up a menu where you can enable ‘Continuous deployment trigger’ and select your main branch so that commits to other branches do not inadvertently cause a release.
- Now you just need to make one more change and you will be ready to create a release and deploy your content! Click on ‘Variables’ on the menu at the top. This will bring up a list of three variables, two named APP_ID (you’ll fill those in later) and one called APP_NAME. Enter a value for the variable APP_NAME: use the name of your project, with hyphens instead of spaces.
Now you can save your pipeline and go to ‘Creating your first release’!
Three-stage pipeline
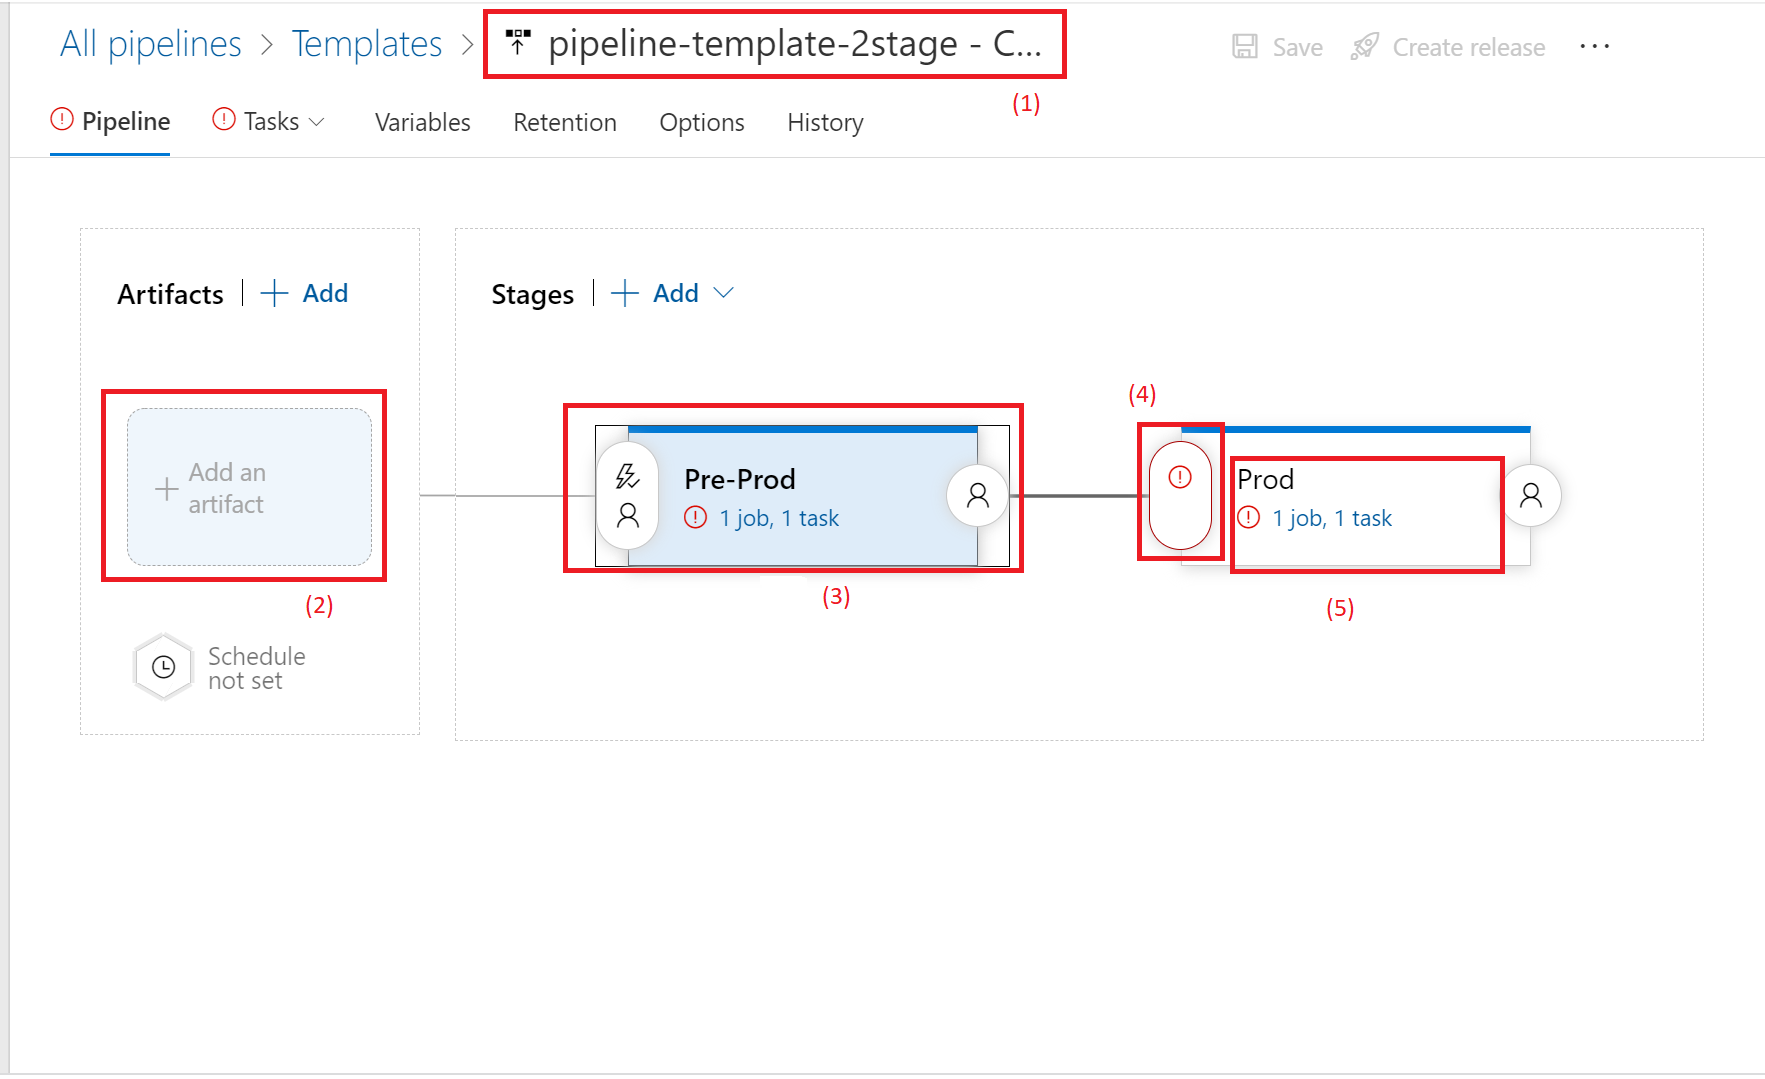
If you are using a 3-stage pipeline, your pipeline page should look like the image below:
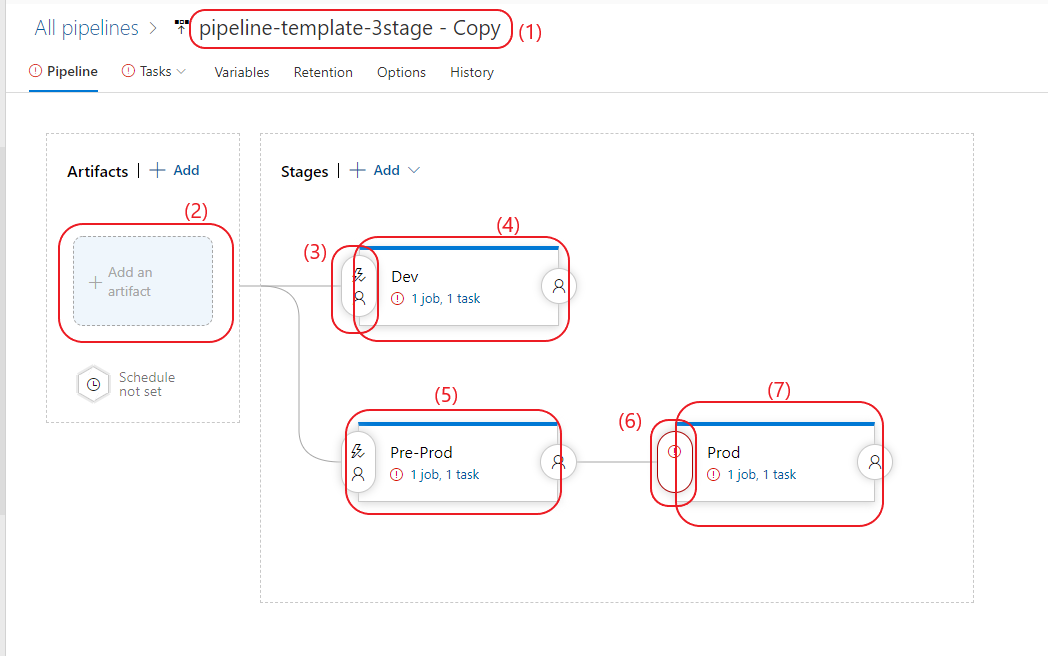
First, you should rename your pipeline. Use the name of your repository or content and use hyphens instead of spaces.
Next you need to add the artifact, if you click on the box on the left that says ‘Add artifact’, it will bring up the menu below.
Here you should select your Azure Devops Project and your repository, after which some additional options will appear below. You should only need to add information for two of them.
For ‘Default branch’, select your main branch (i.e. ‘master’ or ‘main’)
For ‘Default version’, select ‘Latest from the default branch’
Then you can click ‘Add’ to add your artifact.
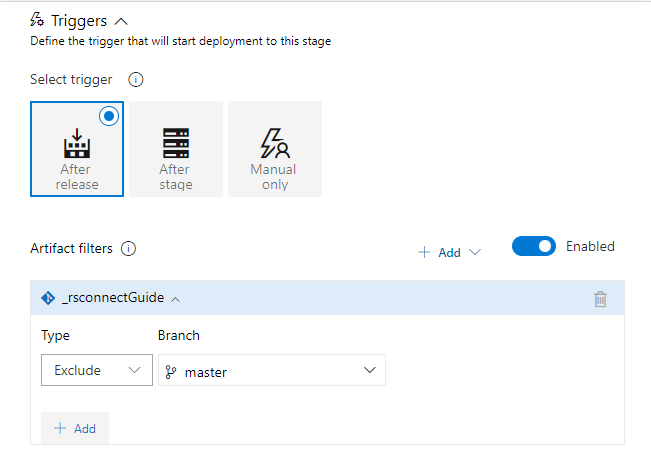
- Click the oval button on the left of the Dev stage. This will bring up the pre-deployment conditions for deployment to dev.
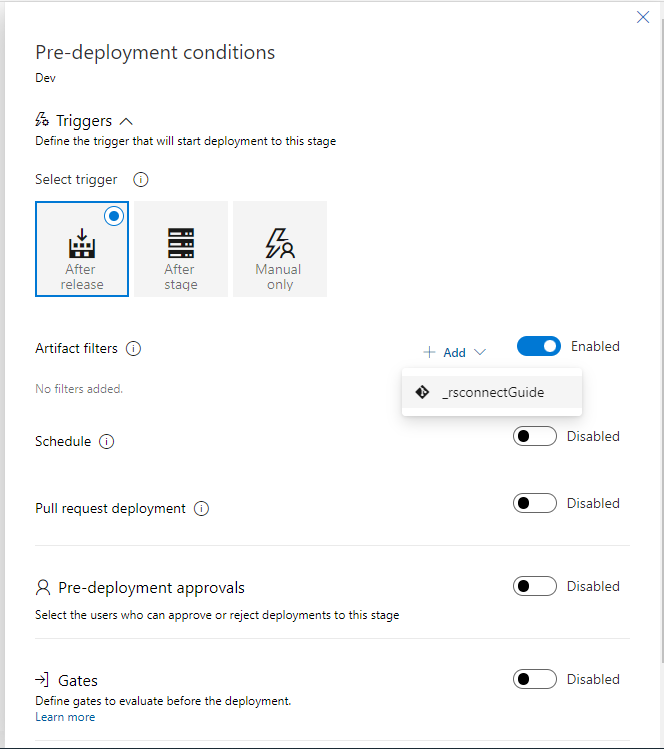
Here you should enable Artifact filters, then click ‘Add’ and select your artifact. In the new filter, select Type as ‘Exclude’ and Branch as your main branch (e.g. main or master). This will ensure that deployment will only happen to Dev when a change is made to a non-main branch.
- Click on the ‘Dev’ box, which will take you to the Task page for that stage. If you click on the ‘Deploy to RSConnect’ task, you should see something similiar to below.
In the setting that requires attention - ‘Agent pool’ - select ‘RSConnect’. If you cannot see it, you will have to raise a service desk request to allow your Azure Devops project access to the build server.
You can then go back to the pipeline view by clicking ‘Pipeline’ in the menu above.
Repeat step 4, for Pre-Prod.
Click the oval button on the left of the Prod stage. This will bring up the pre-deployment conditions for deployment to production.
Here you can either select someone to be the approver, or disable this if you do not want it.
Repeat step 4, but for Prod this time.
Next you should set up your artifact to create a release every time you make a change to the main branch. You can do this by clicking on the lightning bolt symbol on the right of your artifact. This will bring up a menu where you can enable ‘Continuous deployment trigger’ and select your main branch so that commits to other branches do not inadvertently cause a release.
- Now you just need to make one more change and you will be ready to create a release and deploy your content! Click on ‘Variables’ on the menu at the top. This will bring up a list of three variables, two named APP_ID (you’ll fill those in later) and one called APP_NAME. Enter a value for the variable APP_NAME: use the name of your project, with hyphens instead of spaces.
Now you can save your pipeline and go to ‘Creating your first release’!
Creating your first release
If you have followed the steps above correctly, then whenever you push a change to the main branch of your repository it will create a new release for you. The first time however, it is easier to just manually create the release in Azure Devops itself.
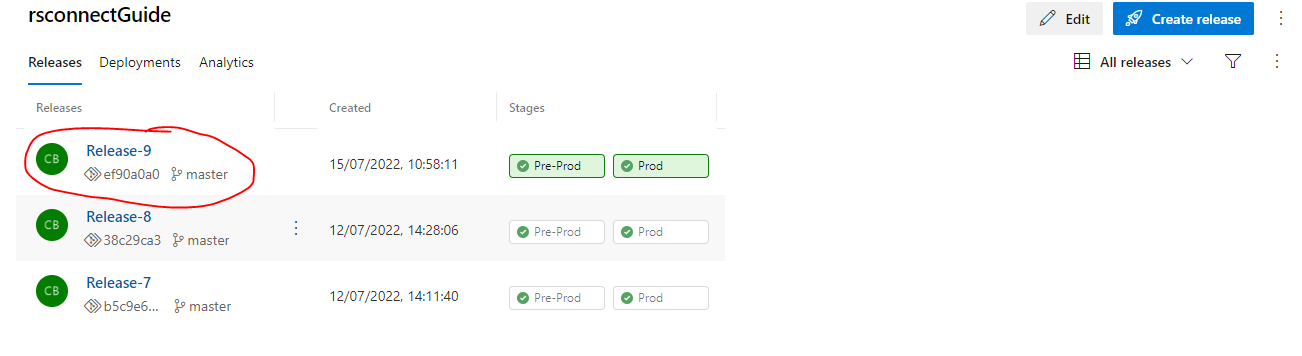
To do this, go to Releases (i.e. see the first screenshot in the ‘Implementing your pipeline’ section) and select your pipeline on the left hand side - you may have to search for it and you should favourite it so that it is more visible in future. If you hover your mouse over the pipeline you will see a star you can click on the right.
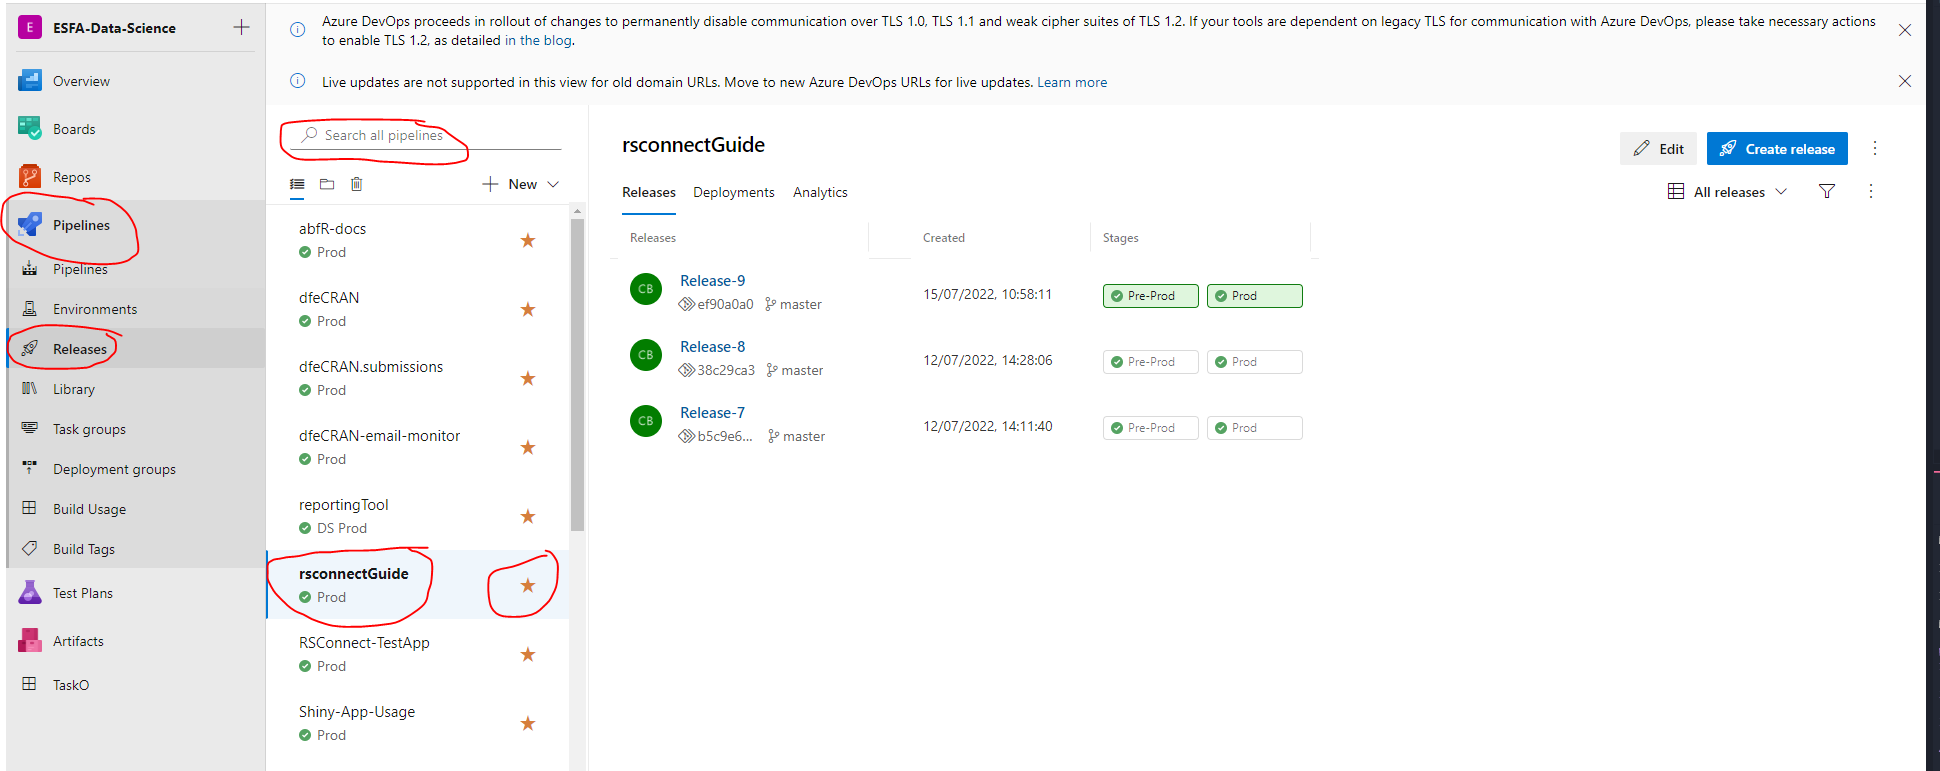
Once you have selected your release pipeline, you can click the blue ‘Create release’ button in the top right to manually create a release. You should see a menu like below (it may differ slightly depending on how you set your pipeline up and how many stages it has):
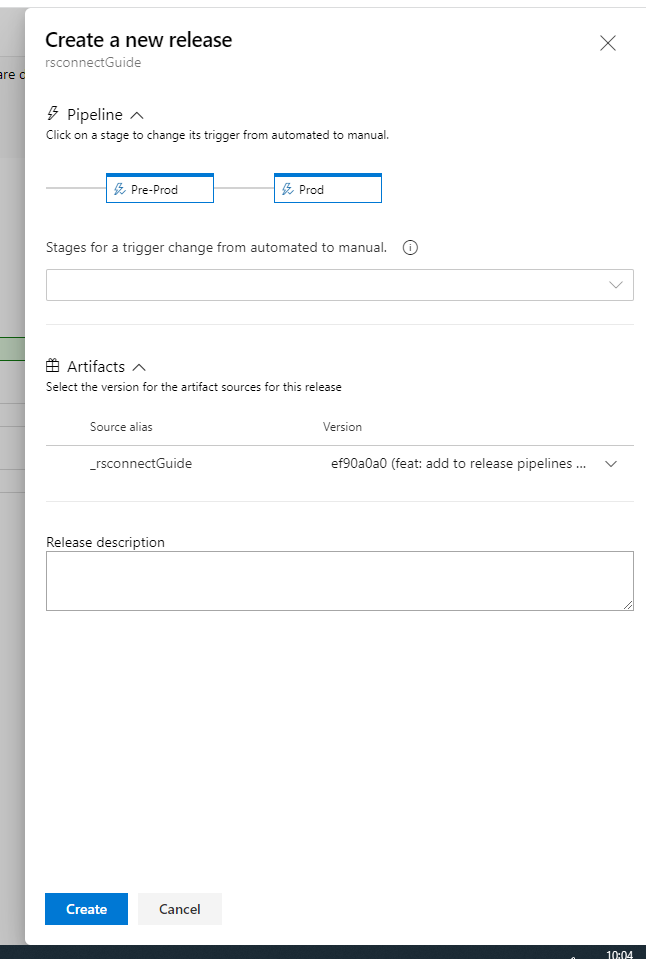
You do not need to change anything here, but for information:
- The ‘Stages for a trigger change from automated to manual.’ section can be used to make sure that e.g. the release does not automatically deploy to Prod once Pre-prod has completed. This might be useful if you are manually creating a release but want to make sure it does not deploy to Production.
- The ‘Artifacts’ section can be used to select a different commit than the most recent from the main branch. It is unlikely you will ever need to change this.
- The ‘Release description’ section can optionally be used to add a comment to your release. This might be useful when you check back in future to remind yourself if there is a specific reason for you manually creating a release (rather than it automatically being created).
Click the ‘Create’ button at the bottom.
You should see a new release appear in the ‘Releases’ section of the page (you may have to refresh the page). The release will be greyed out for all stages but will have started running the tasks of your first stage. You can click on the relase name to monitor the progress of the release but otherwise, wait for a few minutes until the stage(s) are complete. - If your stages all deploy successfully - great! You can continue with this section. - If one or more of your stages are unsuccessful, see the Troubleshooting section for common problems, or post in the DfE R Community Teams site.
Note that sometimes a deployment stage will be marked as ‘Successful’ when it has in fact failed. This is because the status shown in Azure Devops denotes whether the app was successfully bundled and passed to RSConnect and is unaware of whether RSConnect successfully unpacked the app and can display it - although this will be visible from the deployment log.
If your app has successfully deployed to all stages - you’re almost done! There are just a couple of extra steps that need to be completed first.
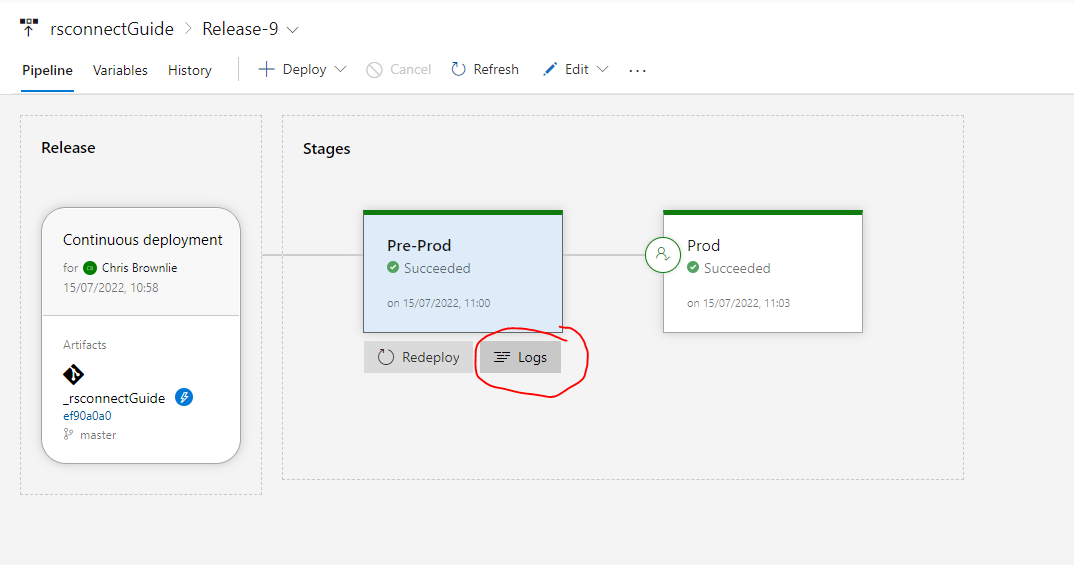
To get more information on your release, you should view the log file for the deployment. To do this, click on a release and then hover over a stage of that release. A ‘Logs’ button should appear, click it. You should then be able to see the following page:
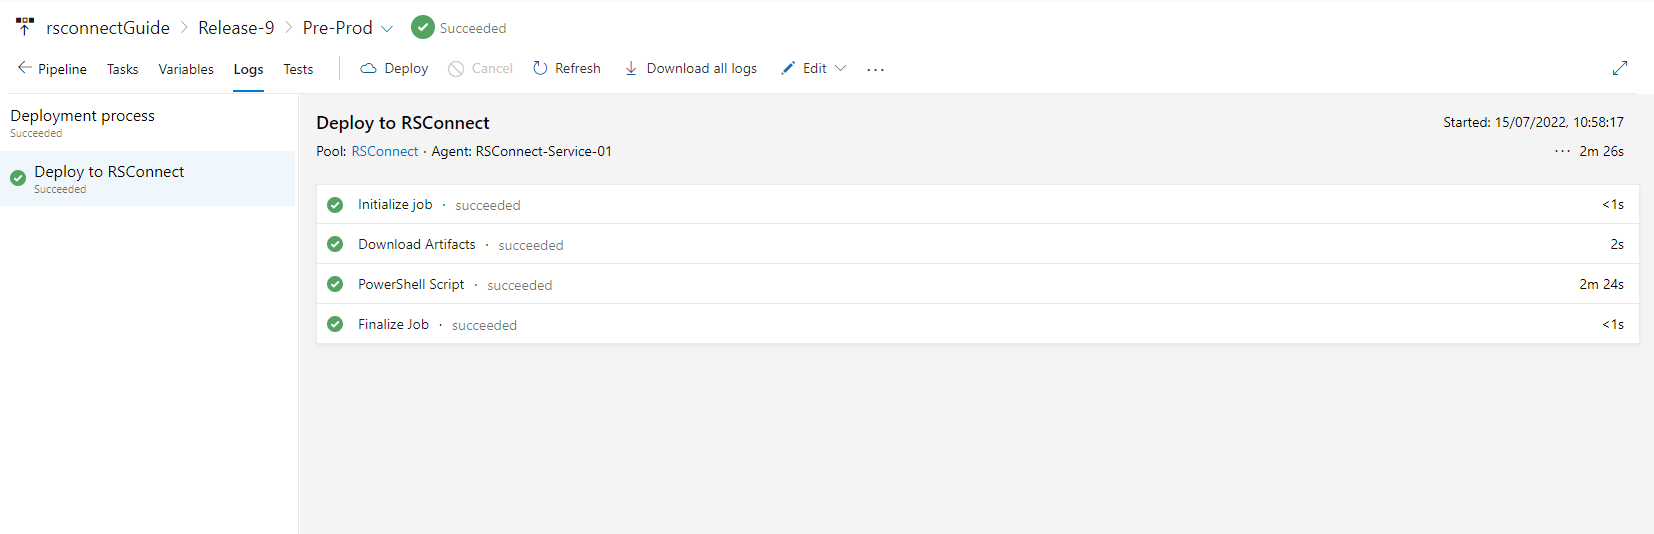
If you then click on the section titled ‘PowerShell Script’, you will see the detailed logs for the main section of the release stage deployment. It will look something like the below:
Reading a deployment log file
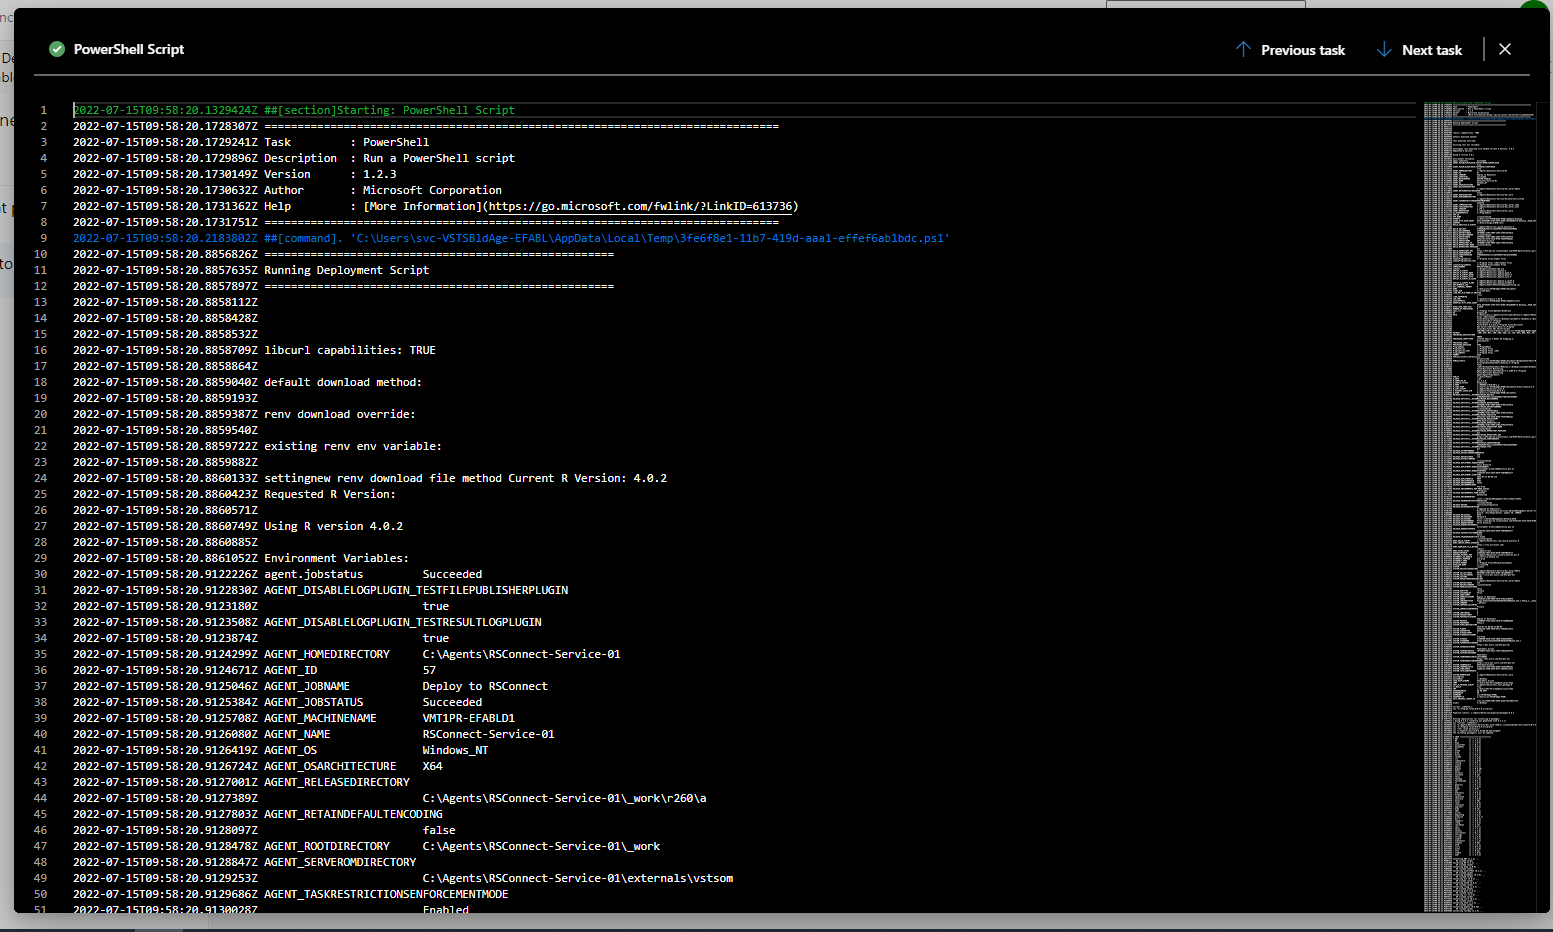
The PowerShell script log is broken up into a few different stages - these correspond to the different stages of the ‘Deploy to RSConnect’ task.
First, the script will print out some information about the Build server (which is where this task is occurring) and then print the value of all available environment variables. For example, if you look for the line that starts ‘RELEASE_ENVIRONMENTNAME’, that will be either Pre-Prod or Prod depending on which stage you are deploying. You can look through these to see what information Azure Devops knows about your deployment.
The task then tries to restore the developer’s environment. This is where
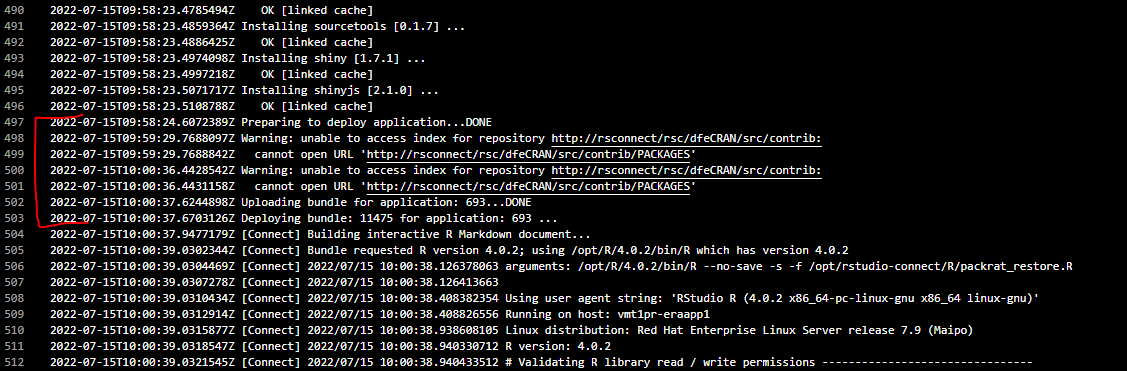
renvis used to install all the packages necessary for your content to run. Note that this is installing these packages onto the Build server, before it then bundles the information up and sends it to the relevant RSConnect server. For this stage of the log file you will be able to see which packages and versions it is trying to install and whether it was successful.The section immediately following the installation of R packages is where the Build server bundles the project and sends it to the RSConnect server. This section starts with the line ‘Preparing to deploy application…DONE’ (row 497 below) and ends with ‘Deploying bundle:…’ (row 503 below). If you see any warnings like those on rows 498-501, they can be ignored. Important: you will need to make a note of your app ID. This is visible on the line ‘Uploading bundle for application: xxx …DONE’ (row 502 below). In this case, the APP_ID is 693. Make a note of that for later.
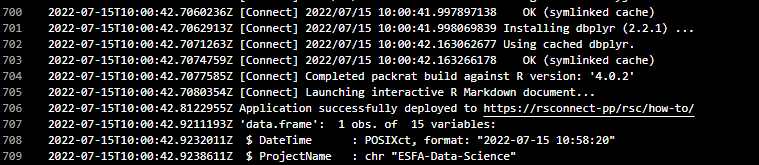
Any lines that start with ‘[Connect]’ are output of code being run on the RSConnect server. The first lines of this section just print some information about the RSConnect server like R version and server info.
Following this, the required R packages are installed on the RSConnect server (so the content can be run). This is when most issues will occur, so check this section if it looks like something has gone wrong.
If the deployment was successful, this section will end with the line ‘Application successfully deployed to…’ and then a URL (row 706 below). Make a note of this URL, as you will need it later.
- The final section gives some information on the deployment - this is stored for information governance purposes for access by RStudio Connect admins.
Final steps
If you remember back in the last step of ‘Implementing your template’, we saw there was an environment variable associated with each stage called APP_ID. This should be filled in for each stage with the integer number you saw in step 3 of reading your deployment log file above (i.e. the ID will be different for each stage).
The final step before being able to see your content is to raise some service desk requests. You can do that here
The first request should be for ‘Change App Access List’. For access you can choose either:
- Entire Organisation: which means everyone in the DfE will be able to view your content
- Specific users/AD Groups: you can give the username/email of individuals (including yourself) to give them access to the content. Alternatively, you can specify an existing AD group to be used to restrict access.
You should then also request to add yourself as a publisher - same link as above (‘Change to user role’ -> ‘Publisher’). This will mean you are able to view the logs for your content once it has been deployed to RSConnect. In the ‘Justification’ section, put something along the lines of ‘I have deployed (’App X’) and wish to be added as a collaborator so I can view the content logs’.
You may also wish to change the URL of your content (Change App URL), as the default URL uses the app GUID and so is not user friendly. Here you can change the URL to something more relevant and easy to remember.
Troubleshooting/FAQs
Below are some common error messages that appear in the deployment log file and how to resolve them - see Reading a deployment log file for information on the structure of a log file. Most of these error messages will occur near the bottom of the log file (sections 5 and 6 of the ‘Reading a deployment log file’).
- “Unable to fully restore the R packages associated with this deployment.”
- This is the most common erorr message and is fairly self explanatory. The exact cause of the error can vary and this message is usually preceded by a large amount of output that may be hard to read.
- First, you should identify the package causing the error. In the image below, it is v8.0.0 of the arrow package.
- If you have recently updated this package and need a quick fix, try installing an older version of the package and redeploying. This can be done by e.g.
remotes::install_version("arrow", "7.0.0")- remembering torenv::snapshot()before deploying. - If you haven’t recently updated or need to use this specific version of the package, please post in the DfE R Community Teams site (Help and Errors channel) as it will likely require a change to the RSConnect server configuration.
![]()
- “Unknown content type”
- This is caused by the project not meeting one of the requirements for identifying the content type. See the ‘Content types’ section above.
- “Application depends on package”x” but it is not installed”
- This usually means you haven’t
renv::snapshot()ted before deploying. Make sure you have all the named packages installed before snapshotting and redeploying.
- This usually means you haven’t
- “Error in result_insert_dataframe/Invalid character value for cast specification”
- If this error message appears at the bottom of your deployment log file, it most likely means that you have not specified your APP_ID environment variable correctly. Note that this will not affect your deployment as it is a post-deployment task that has failed. All the same, you should make sure your APP_ID environment variables are all integer numbers (see step 3 of ‘Reading a deployment log file’)
- You have deployed successfully, but when you visit your app it says: “The application failed to start. Contact the author or review the logs for more information.”
- This means the deployment was successful but there was an error when running your app. You should check the logs for your app to see what the issue was.
- To do this, you must be a publisher on RSConnect and collaborator of the app. If you are not already, raise a service desk request (see the ‘Final steps’ section for how to do this).
- Then you can see the logs by going to https://rsconnect/rsc/connect/#/apps/xxx/logs (prod) or https://rsconnect-pp/rsc/connect/#/apps/xxx/logs (pre-prod), where ‘xxx’ is the APP_ID for your app.
Glossary
Artifact: the repository that a release pipeline is looking at.
Build server: a computer that is used to deploy content to RSConnect - it is the stepping stone between Azure Devops and the RSConnect servers
Content: some R code that displays something and can be deployed to RSConnect - e.g. a Shiny app or an RMarkdown Document.
Deployment: See ‘Release’.
Pipeline: technically a ‘Release pipeline’. A set of stages which take in a snapshot of a repository and run some code, optionally with other conditions or filters.
Release: a snapshot of your repository that is to be passed to various stages within a pipeline.
RSConnect: RStudio Connect, a web server for hosting R content. Note that this can mean RSConnect servers (i.e. the machine the content is hosted on) or RSConnect the software (which is installed on the servers and does all the work of hosting the content.)
Stage: a step in a pipeline which takes in a snapshot of a repository and runs some code. In 99% of cases that code will be ‘deploy this content to RSConnect’.